Integrating Claude AI Assistant with Apache Superset
Apache Superset provides a simple, no-code interface that allows users to create a wide variety of charts and dashboards from data stored in a datastore. In a short time, it is possible to build visually appealing dashboards with minimal effort. However, there is one limitation that no predefined chart or dashboard can overcome: when someone requests information that was not planned during the dashboard design phase, modifications are required to satisfy the new requirement.
Integrating an AI Agent with Apache Superset allows us to leverage the capabilities of Artificial Intelligence to retrieve the information we need simply by asking the agent, without waiting for a data analyst or dashboard designer to implement the requested changes.
The purpose of this article is to demonstrate how to integrate Claude AI with Superset, enabling a specialized AI agent focused on business intelligence and data analysis, ready to answer our questions. The integration is based on the MCP (Model Context Protocol) and can be applied to any AI solution that supports it. Claude was chosen primarily because its free account allows an MCP server to be connected for testing purposes, a capability that is not currently available with other vendors. Let’s proceed step by step.
What is Apache Superset
Apache Superset is a modern, cloud-native, open-source Business Intelligence and data visualization platform. Developed in Python and TypeScript, it can connect to most SQL-based data stores and was designed to replace or augment traditional BI tools with a lighter, more extensible solution that integrates easily into cloud-native environments through Docker and Kubernetes. It provides an intuitive no-code interface for creating beautiful charts and dashboards from data stored in backend systems. It allows users to visualize data, build multiple chart types based on metrics and dimensions, create interactive dashboards, and apply filters and cross-filters. Superset also supports authentication and fine-grained RBAC-based authorization, as well as dashboard embedding within external web pages and applications.
MCP Features Available in Superset
The latest version of Superset (version 6.1.0) includes a built-in MCP (Model Context Protocol) server that enables AI assistants such as Claude, ChatGPT, and other MCP-compatible clients to interact directly with a Superset instance. Through the MCP protocol, clients can browse dashboards, query datasets, execute SQL statements, create charts, and much more.

It is important to note that the MCP server must be exposed to the Internet in order to be reachable by AI agents. Consequently, authentication and access control are critical aspects of ensuring a secure deployment.
The MCP server natively exposes the following tool categories.
| Category | Tools |
|---|---|
| Exploration & Discovery | health_check, get_instance_info, get_schema |
| Datasets | list_datasets, get_dataset_info, create_virtual_dataset |
| Charts | list_charts, get_chart_info, get_chart_data, get_chart_preview, get_chart_type_schema, generate_chart, update_chart, update_chart_preview, generate_explore_link |
| Dashboards | list_dashboards, get_dashboard_info, generate_dashboard, add_chart_to_existing_dashboard |
| SQL | execute_sql, save_sql_query, open_sql_lab_with_context |
| Databases | list_databases, get_database_info |
AI agents can invoke these tools through MCP to explore data, create charts, or generate dashboards as needed. It is also possible to extend the server by adding custom tools tailored to specific requirements.
Security and Authentication Mechanisms
Security is a fundamental aspect of this type of integration because we are granting an AI agent—an external entity—access to our data. For this reason, a two-layer security model should be implemented:
- We must ensure that the entity accessing the data is properly authorized.
- We must ensure that the AI agent cannot perform destructive operations on the data.
For the first security layer, we use the JWT-based authentication mechanism supported by Superset MCP together with Microsoft Entra ID acting as the OAuth 2 Authorization Server. Superset MCP is capable of validating JWT tokens, but it does not implement the OAuth discovery endpoints required by the MCP specification. Therefore, a proxy must be placed in front of Superset MCP while Microsoft Entra ID serves as the authorization server. Microsoft Entra ID receives the token request from Claude AI, generates an RS256-signed JWT, and Claude AI subsequently connects to the MCP server using the issued token, which is validated by Superset MCP.
For the second security layer, we use Superset’s RBAC capabilities by assigning the connecting user a role with only the permissions required for the intended operations, avoiding privileges such as can edit or can delete. In addition, to prevent destructive SQL operations, Superset is configured to connect to the data source using a database account with restricted grants on schemas and tables.
Anthropic Claude AI
Claude AI and Claude Desktop allow users, even with the free edition, to add a custom MCP connector and support OAuth 2 authentication with PKCE. Through the connector configuration interface, users can specify the HTTPS URL of the MCP server together with the OAuth Client ID and Client Secret required for authentication against the authorization server. For the authentication flow to succeed, the MCP server (or the proxy) must expose the OAuth discovery endpoints required by the MCP specification.
GET /.well-known/oauth-protected-resource
GET /.well-known/oauth-authorization-server
Without these endpoints, Claude has no way of discovering that Microsoft Entra ID is the authorization server.
Integration Flow
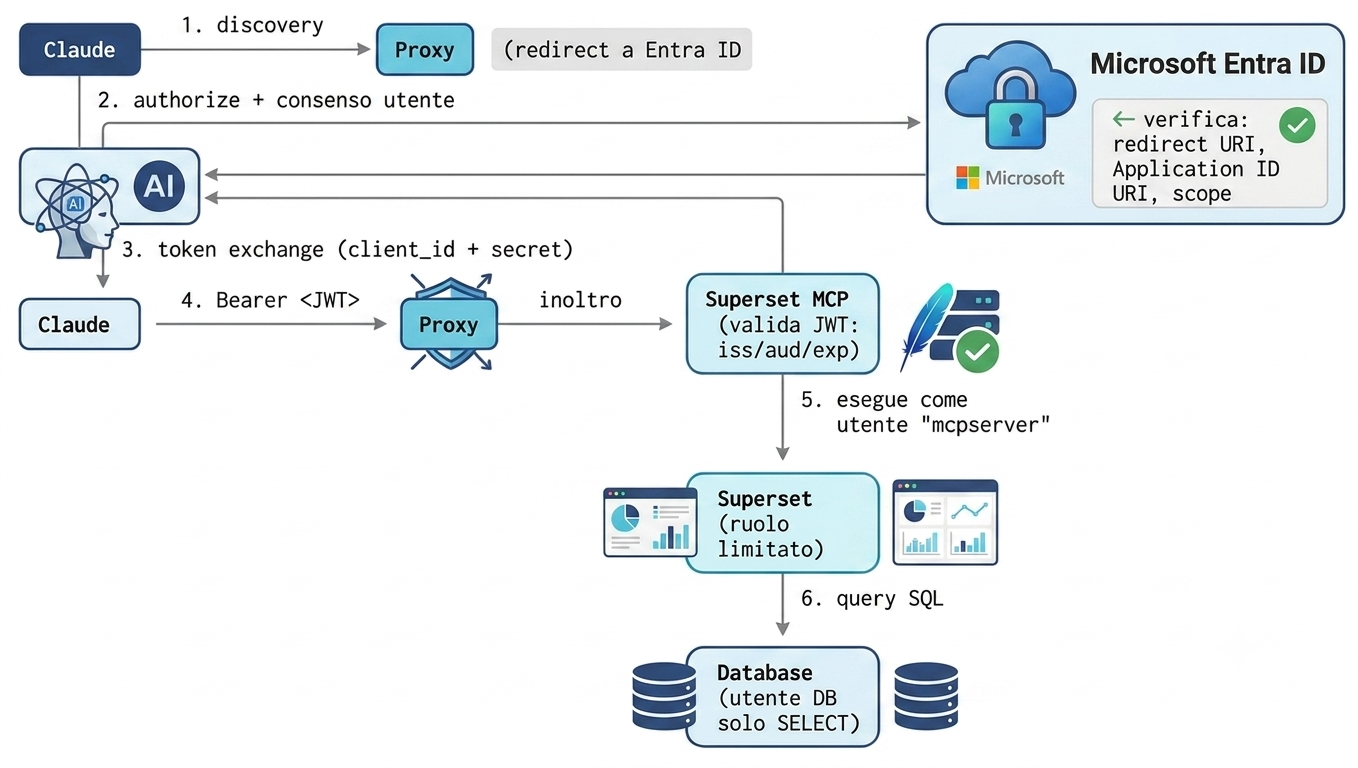
The end-to-end authentication and integration workflow can be summarized as follows.
Architecture and Implementation Details
The reference architecture consists of several components, each responsible for a specific role.
- Claude AI Agent: the AI client used for the integration. It connects to the Superset MCP server and authenticates through Microsoft Entra ID.
- Microsoft Entra ID: the authorization server responsible for centralized authentication.
- MCP Proxy: a lightweight discovery layer that exposes the
.well-knownendpoints not natively implemented by Superset MCP. - Superset MCP Server: the MCP server responsible for validating JWT authentication tokens and exposing the tools required for data exploration.
- Superset Server: the native Superset server responsible for managing databases, datasets, users, permissions, and RBAC roles.
- Datastore: the database accessed by Superset using a database account with restricted privileges (for example,
SELECTonly).
Prerequisites
For this implementation, I chose to deploy the MCP Proxy together with the Superset MCP and Superset servers as Docker containers running on an AWS EC2 instance. Since the MCP server must expose an HTTPS endpoint to integrate with Claude AI, I configured an AWS Application Load Balancer (ALB) with an HTTPS listener on port 443 and configured the MCP Proxy as its target group.
MCP Proxy Configuration
The MCP Proxy is a lightweight Python application listening on port 8000 over HTTP that performs two primary tasks:
- It directly responds to the two
.well-knownendpoints, advertising the protected resource (resource) and pointing clients to Microsoft Entra ID as the authorization server. - It forwards all other requests (specifically
/mcp) to the Superset MCP server, which listens internally on port 5008 and is not directly exposed.
The following Python implementation illustrates the proxy. The configuration variables have the following meaning:
| Variable | Description |
|---|---|
| TENANT_ID | Microsoft Entra ID tenant identifier |
| RESOURCE_URI | Public HTTPS URL of the MCP server (for example, https://mymcpsuperset.com), representing the protected resource |
| SCOPE_URI | OAuth scope that Claude must request from Microsoft Entra ID (for example, https://mymcpsuperset.com/access_as_user), representing the API scope registered in Entra ID |
| SUPERSET_MCP_UPSTREAM | Internal URL of the Superset MCP server |
import os
from fastapi import FastAPI, Request, Response
from fastapi.responses import JSONResponse
import httpx

app = FastAPI()

TENANT_ID = os.getenv("TENANT_ID", "")
RESOURCE_URI = os.getenv("RESOURCE_URI", "")
SCOPE_URI = os.getenv("SCOPE_URI", "")
SUPERSET_MCP_UPSTREAM = os.getenv("SUPERSET_MCP_UPSTREAM", "")

@app.get("/health")
async def health():
    return {"status": "ok"}

@app.get("/.well-known/oauth-protected-resource")
async def protected_resource_metadata():
    return {
        "resource": RESOURCE_URI,
        "authorization_servers": [
            f"https://login.microsoftonline.com/{TENANT_ID}/v2.0"
        ],
        "bearer_methods_supported": ["header"],
        "scopes_supported": [f"{SCOPE_URI}"]
    }

@app.get("/.well-known/oauth-authorization-server")
async def authorization_server_metadata():
    async with httpx.AsyncClient(timeout=10) as client:
        r = await client.get(
            f"https://login.microsoftonline.com/{TENANT_ID}/v2.0/.well-known/openid-configuration"
        )
        return r.json()

@app.api_route("/mcp", methods=["GET", "POST", "DELETE"])
async def proxy_mcp(request: Request):
    body = await request.body()
    headers = {k: v for k, v in request.headers.items() if k.lower() != "host"}
    async with httpx.AsyncClient(timeout=30) as client:
        resp = await client.request(
            request.method,
            f"{SUPERSET_MCP_UPSTREAM}/mcp",
            content=body,
            headers=headers,
        )
    return Response(
        content=resp.content,
        status_code=resp.status_code,
        headers={"content-type": resp.headers.get("content-type", "application/json")},
    )

@app.middleware("http")
async def log_unmatched(request: Request, call_next):
    response = await call_next(request)
    if response.status_code == 404:
        print(f"[UNMATCHED] {request.method} {request.url.path}")
    return response
Superset MCP Configuration
The MCP server is an additional Superset endpoint that exposes the tools required for data exploration. It can be started using the following command:
CMD ["superset", "mcp", "run", "--host", "0.0.0.0", "--port", "5008"]
The following Dockerfile can be used to build the MCP server image.
FROM apache/superset:latest

# Switch to root for package installation
USER root

RUN apt-get update && \
    apt-get install -y \
    pkg-config \
    python3-dev \
    gcc \
    g++ \
    default-libmysqlclient-dev \
    && rm -rf /var/lib/apt/lists/*

RUN apt-get clean && rm -rf /var/lib/apt/lists/*

RUN . /app/.venv/bin/activate && \
    uv pip install \
       pip \
       fastmcp \
       Authlib \
       pyjwt \
       "mysqlclient<2.2" \
       pymysql \
       thrift

# Apply config
COPY config/superset_config.py /app/pythonpath/superset_config.py
COPY config/superset_config_mcp.py /app/pythonpath/superset_config_docker.py
COPY jwt_verifier.py /app/superset/mcp_service/jwt_verifier.py

# Switch to original user
USER superset

EXPOSE 5008
CMD ["superset", "mcp", "run", "--host", "0.0.0.0", "--port", "5008"]
Due to a compatibility issue, it was necessary to modify the file /app/superset/mcp_service/jwt_verifier.py. The following error was returned by the system:
DEBUG:superset.mcp_service.jwt_verifier:Token validation failed: 'DetailedJWTVerifier' object has no attribute 'jwt'
WARNING:superset.mcp_service.jwt_verifier:JWT authentication failed: Token validation failed
To resolve the issue, within Step 3: Decode and Verify Signature, I replaced the following line:
claims = self.jwt.decode(token, verification_key)
with:
access_token = await super().load_access_token(token)
if access_token is None:
    return None
claims = access_token.claims
Superset MCP Variables (superset_config_mcp.py)
MCP_AUTH_ENABLED=true
MCP_DEV_USERNAME=mcpserver
MCP_SERVICE_HOST=0.0.0.0
MCP_SERVICE_PORT=5008
MCP_SERVICE_URL=https://mymcpsuperset.com
MCP_JWT_ALGORITHM=RS256
MCP_JWKS_URI=https://login.microsoftonline.com/{TENANT_ID}/discovery/v2.0/keys
MCP_JWT_ISSUER=https://login.microsoftonline.com/{TENANT_ID}/v2.0
MCP_JWT_AUDIENCE={CLIENT_ID}
MCP_DEBUG=true
MCP_JWT_DEBUG_ERRORS=true
| Variable | Description |
|---|---|
| MCP_AUTH_ENABLED | Enables JWT authentication |
| MCP_DEV_USERNAME | Superset username |
| MCP_SERVICE_HOST | MCP server bind address |
| MCP_SERVICE_PORT | MCP server listening port |
| MCP_SERVICE_URL | Public base URL of the MCP server |
| MCP_JWT_ALGORITHM | JWT signing algorithm |
| MCP_JWKS_URI | JWKS endpoint URL |
| MCP_JWT_ISSUER | Expected iss claim in the JWT token |
| MCP_JWT_AUDIENCE | Expected aud claim in the JWT token |
| MCP_DEBUG | Enables debug logging |
| MCP_JWT_DEBUG_ERRORS | Enables detailed JWT authentication debugging |
Microsoft Entra ID Configuration
Microsoft Entra ID is the authorization server responsible for generating the token that is then passed to the MCP server, where it is validated to grant access. The required Entra ID configuration steps can be summarized as follows.
1. App Registration
Register an application in Microsoft Entra ID → App registrations → New registration. This application represents your MCP server as a protected resource.
2. Expose an API
In App registration → Expose an API, configure the Application ID URI so that it exactly matches the MCP server URL (e.g. https://mymcpsuperset.com). Then add the access_as_user scope so that the complete generated scope URI is:
https://mymcpsuperset.com/access_as_user
3. API Permissions
In API permissions → Add a permission → My APIs, select the application itself and then select the scope in order to establish the relationship between the client application and the exposed API scope.
4. Authentication — Redirect URI
In Authentication → Redirect URI → Add Redirect URI, add the Claude callback URIs:
https://claude.com/api/mcp/auth_callback
https://claude.ai/api/mcp/auth_callback
5. Certificates & secrets — Client Credentials
Create a Client Secret that will be used by the OAuth client to authenticate with Microsoft Entra ID.
6. Manifest — Token Version
Edit the application Manifest and configure the parameter:
accessTokenAcceptedVersion = 2
Claude AI Desktop Configuration
In Claude Desktop, navigate to Settings → Connectors, add a Custom Connector, and configure the following parameters:
| Parameter | Value |
|---|---|
| MCP Server URL | https://mymcpsuperset.com/mcp |
| OAuth Client ID | Entra Client ID |
| OAuth Client Secret | Entra Client Secret Value |
At this point, if all configurations are correct, the Claude AI Connector can establish a connection with the MCP server through OAuth authentication using Microsoft Entra ID.
After the JWT token validation is successfully completed, the connector will appear in the Connected state.
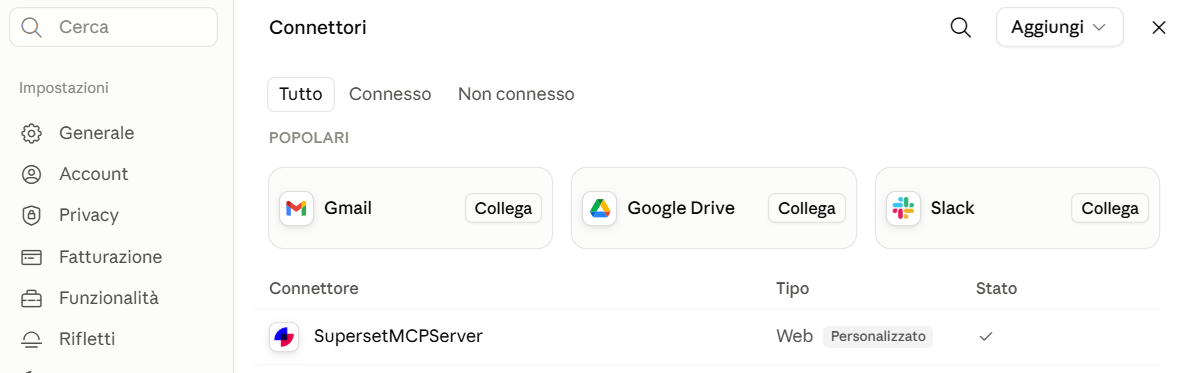
Claude Desktop at work on data through Superset MCP
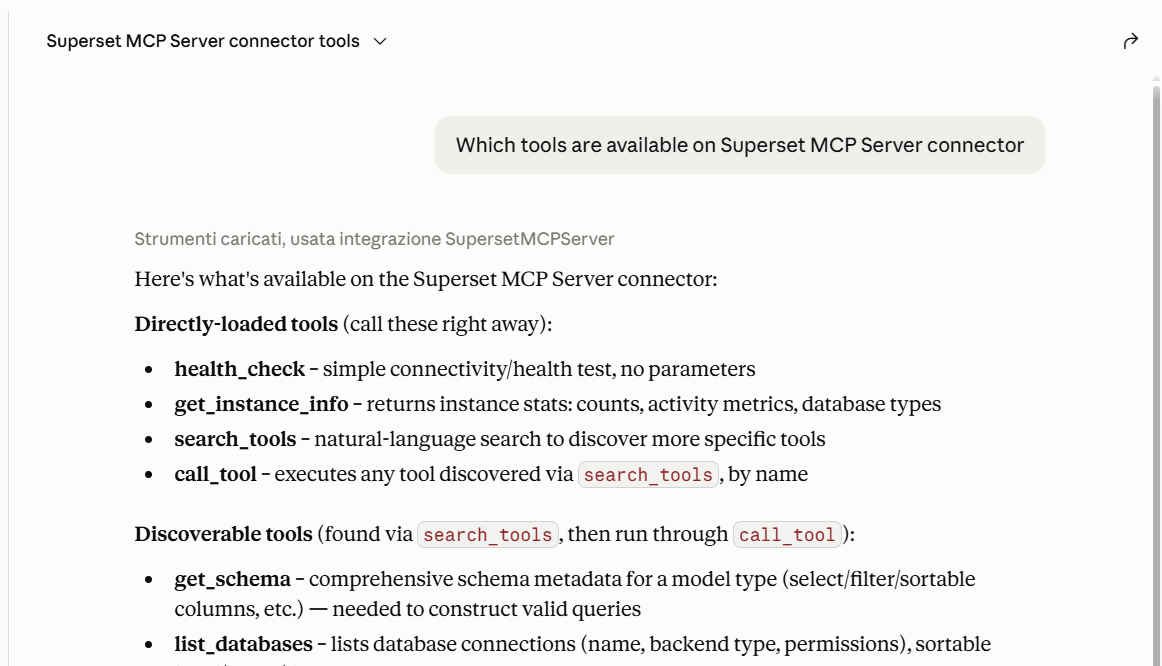
Now let’s put Claude Desktop to work. We can start by simply asking which tools are available through the configured connector.
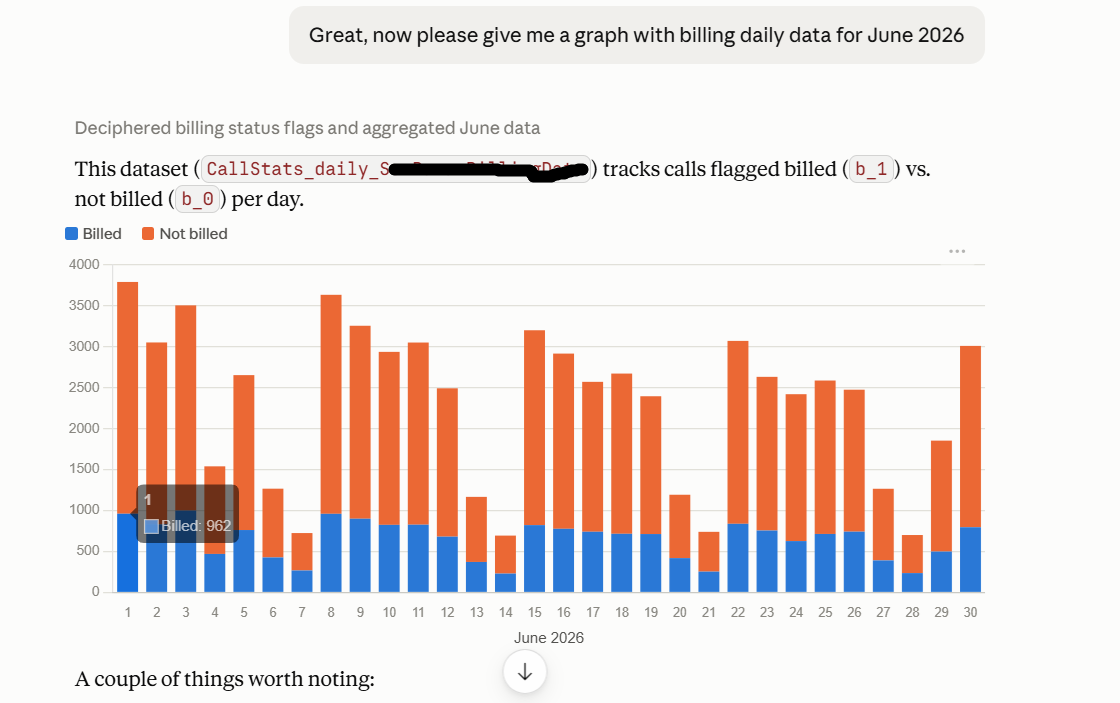
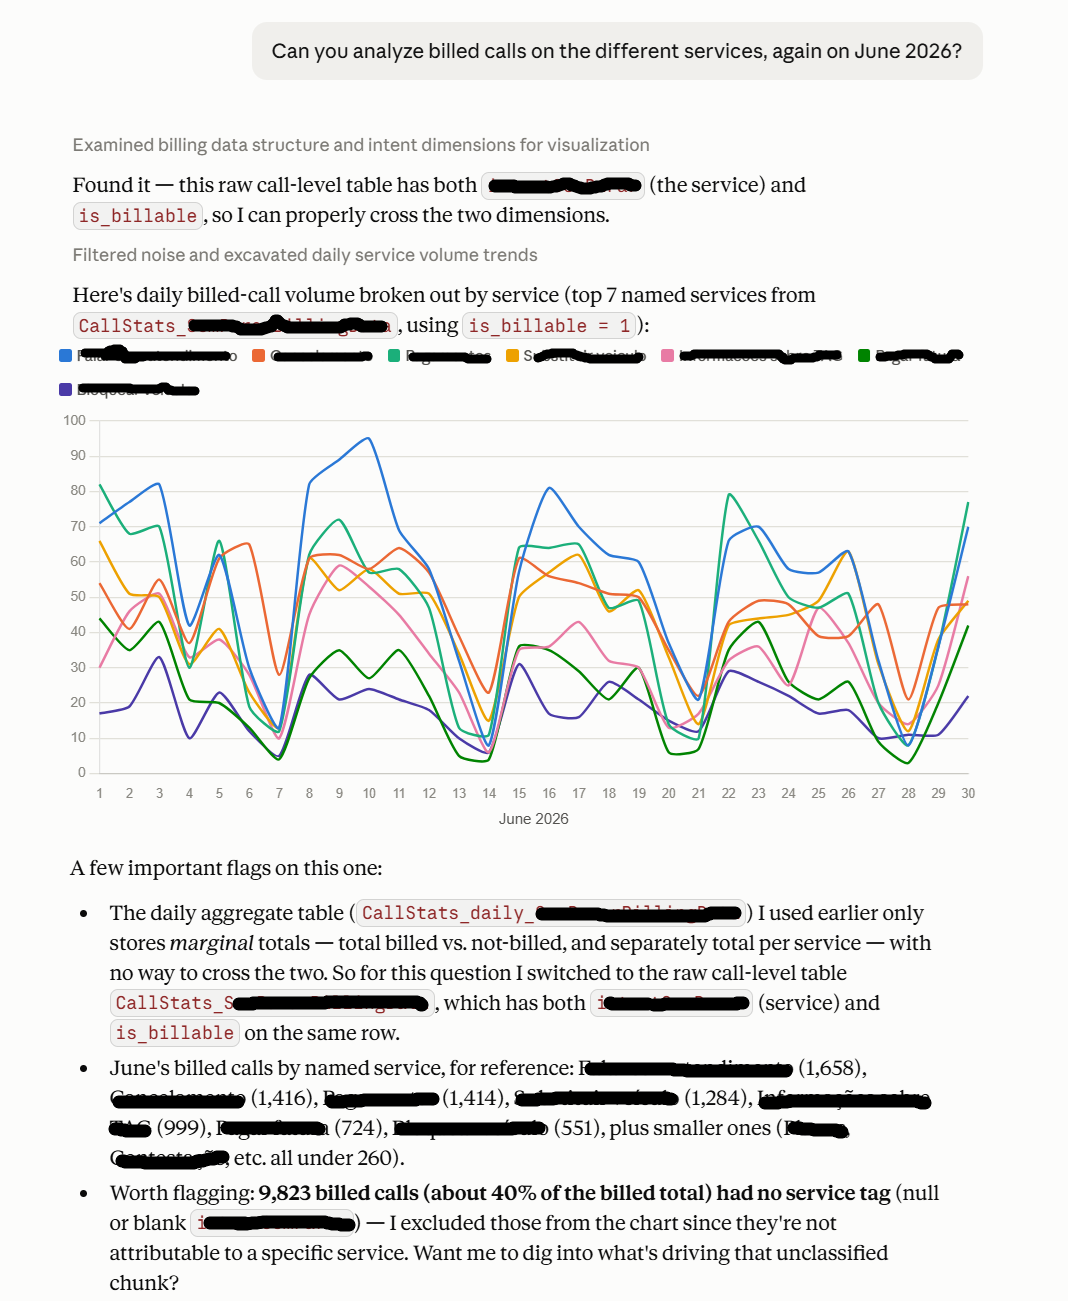
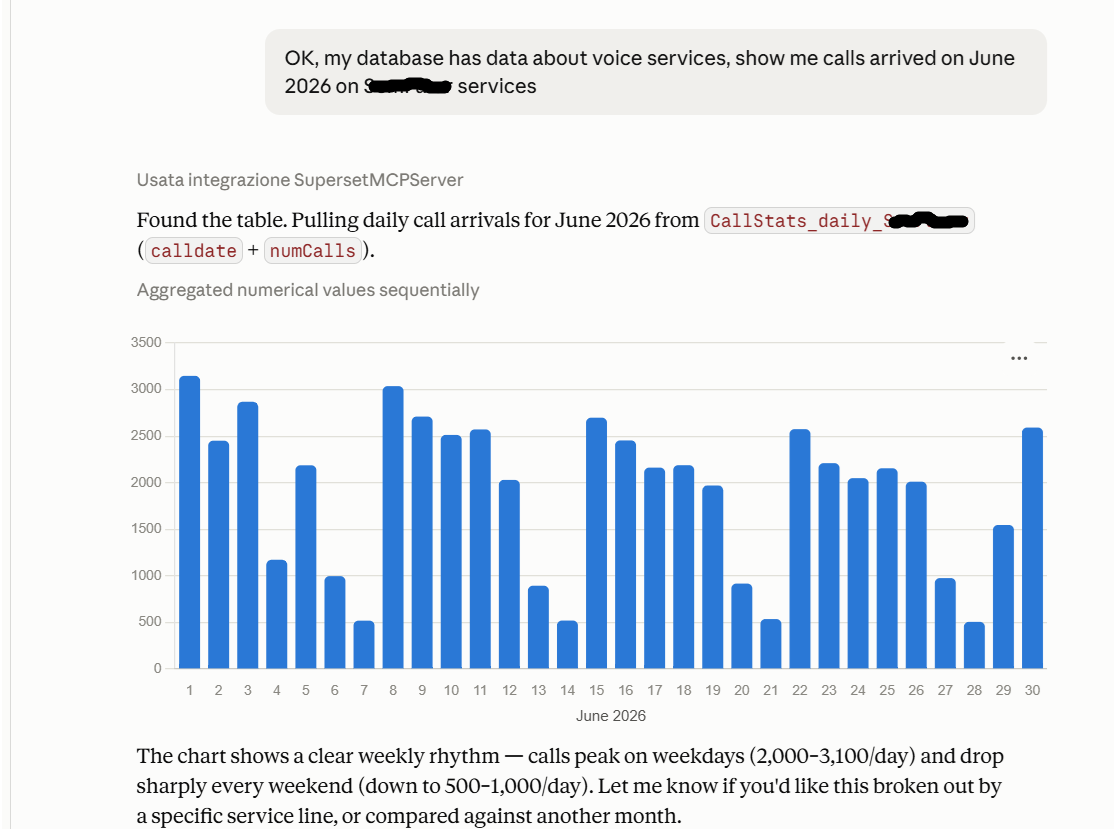
My database contains traffic data related to voice services provided by an automated media server. Let’s ask Claude to show the daily incoming calls received during June 2026.
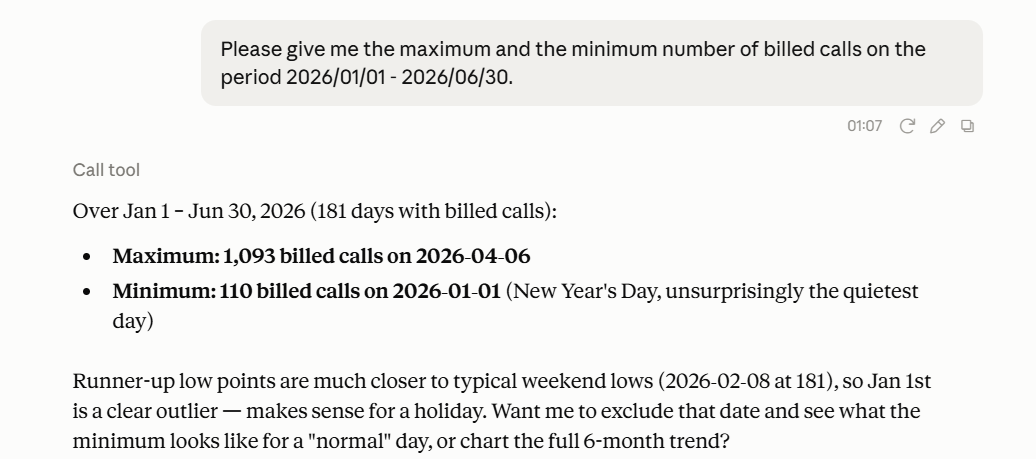
We can continue with additional data retrieval or data analysis requests. The system retrieves the required information, processes it, and presents the results according to our requirements.